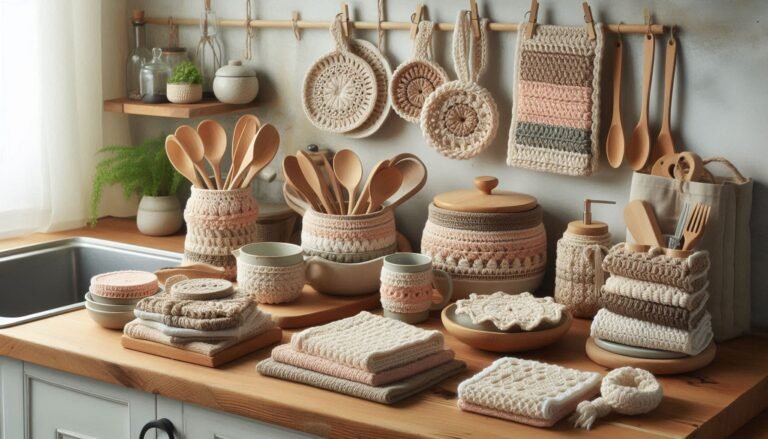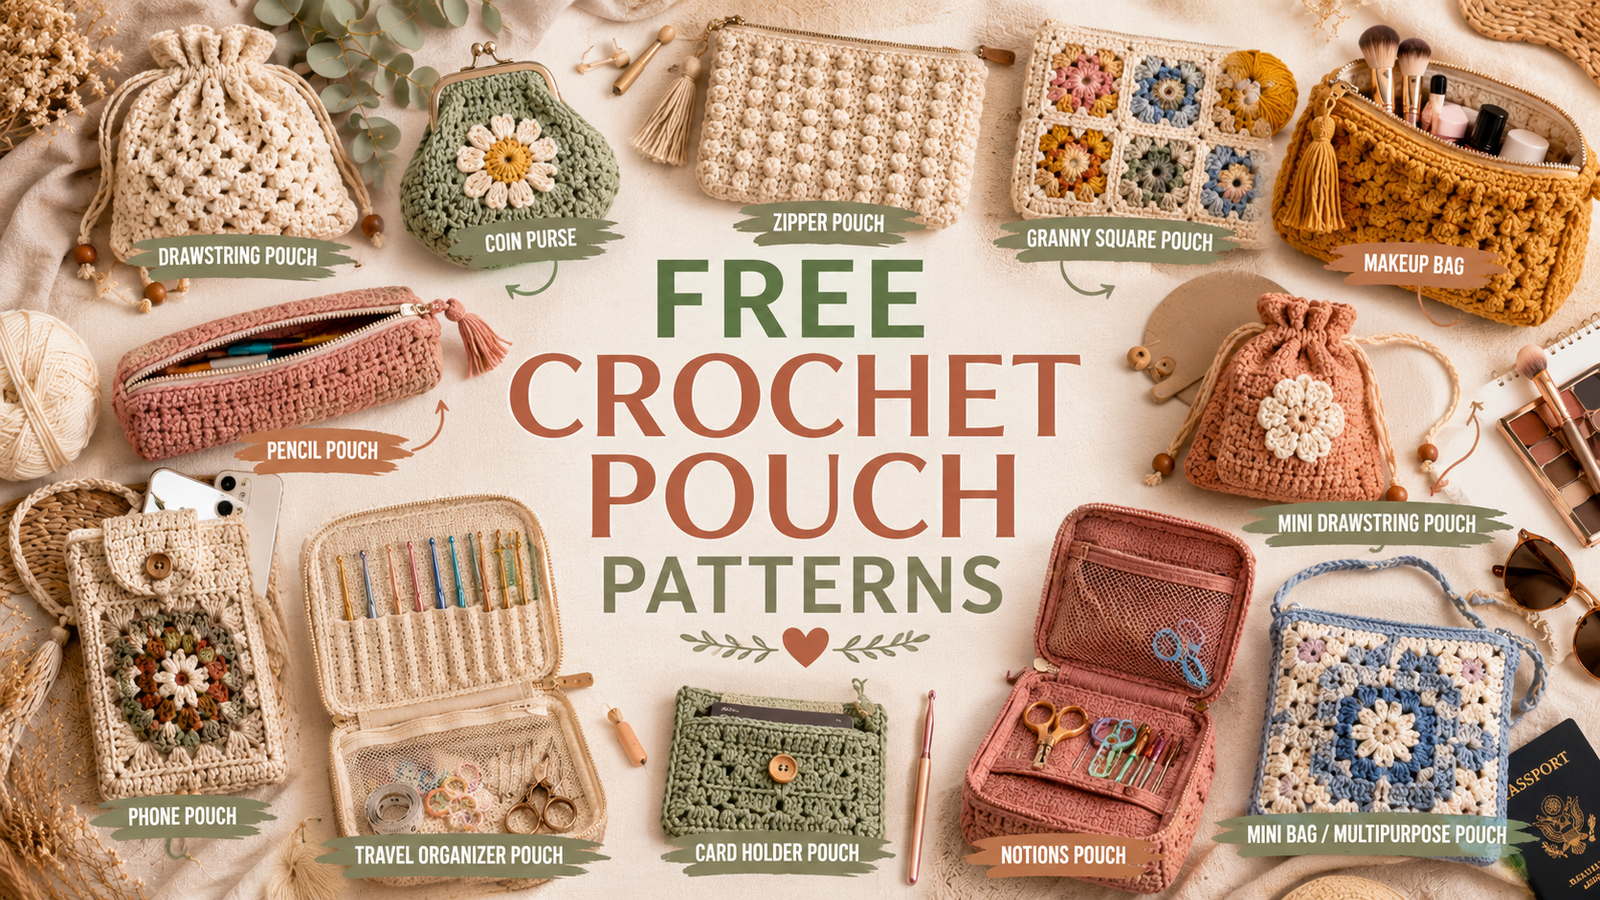
Crochet pouches are one of the most practical and satisfying projects you can make. They work up quickly, use minimal yarn, and can be customized in endless ways. Whether you need a crochet coin purse, a crochet makeup bag, a crochet travel pouch, or a simple crochet drawstring pouch, there’s a design to fit every purpose.
These small projects are especially popular because they’re beginner-friendly, portable, and perfect for using leftover yarn from larger projects. They also make thoughtful handmade gifts and are among the best crochet items to sell at craft fairs and online marketplaces.
In this collection, you’ll find 10 crochet pouch ideas ranging from simple beginner projects to stylish accessories featuring zippers, granny squares, textured stitches, and practical storage solutions. Each design can be adapted to your favorite colors, yarn types, and personal style.
Why Crochet Pouches Are So Popular
Before diving into the patterns, let’s look at why crochet pouches have become a favorite project among crocheters.
Perfect for Beginners
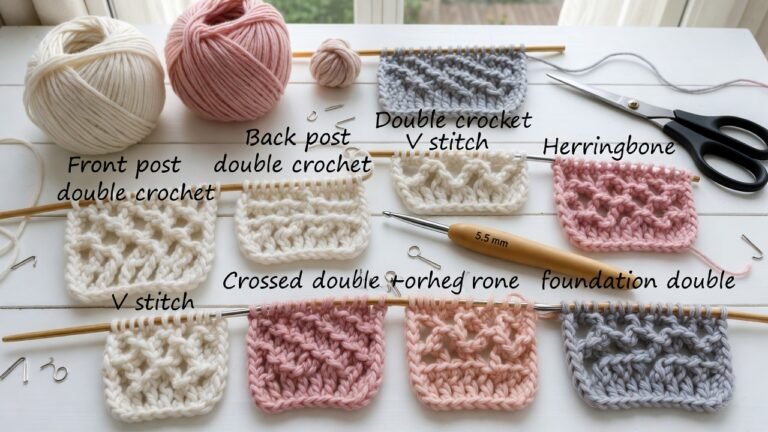
Most crochet pouch patterns use basic stitches such as:
- Single crochet
- Half double crochet
- Double crochet
- Slip stitch
Because of their simple construction, beginners can complete many pouches in just a few hours.
Great Stash-Buster Projects
Crochet pouches require very little yarn compared to blankets, sweaters, or bags. They’re ideal for using leftover cotton yarn, acrylic yarn, or colorful scraps from previous projects.
Practical and Functional
Unlike decorative projects that may sit on a shelf, crochet pouches can be used every day for:
- Coins
- Makeup
- Crochet hooks
- Earbuds
- Sunglasses
- Travel essentials
- Gift packaging
- Cards and cash
Excellent Handmade Gifts
A handmade crochet pouch is both beautiful and useful. Pair one with skincare products, stationery, chocolates, or gift cards for a personalized present.
Best Yarn for Crochet Pouches
Choosing the right yarn makes a huge difference in durability and appearance.
Cotton Yarn
Cotton yarn is often the best choice for crochet pouches because it:
- Holds its shape well
- Creates sturdy fabric
- Resists stretching
- Provides excellent stitch definition
Acrylic Yarn
Acrylic yarn is affordable and available in countless colors. It’s a great option for decorative pouches and beginner projects.
Cotton Blends
Cotton blends combine durability with softness, making them ideal for makeup bags and travel pouches.
Best Crochet Hook Sizes
The hook size depends on your yarn choice, but these are the most common options:
| Yarn Weight | Recommended Hook |
| DK | 3.5mm–4.5mm |
| Worsted | 4.5mm–5.5mm |
| Cotton Worsted | 4mm–5mm |
For pouches, many crocheters choose a hook slightly smaller than the recommended size to create denser fabric with fewer gaps.
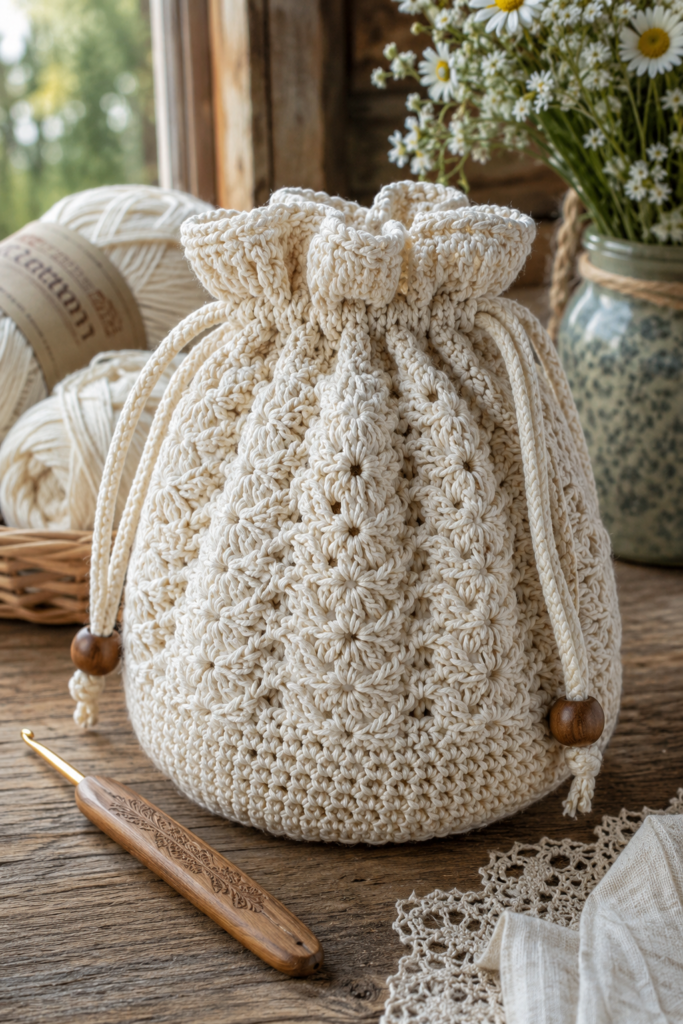
Easy Crochet Drawstring Pouch
Skill Level
Beginner
Best For
Jewelry, gift packaging, travel storage, and small accessories.
A crochet drawstring pouch is often the first pouch project many crocheters make. The construction is simple, requiring only a basic rectangle or circular base and a drawstring closure.
Why you’ll love it:
- Quick project
- Minimal supplies
- Perfect stash buster
- Great handmade gift
Step-by-Step Tutorial
Materials
- 100g cotton yarn
- 4mm crochet hook
- Yarn needle
- Scissors
- 2 wooden beads (optional)
Abbreviations
- ch = chain
- sc = single crochet
- sl st = slip stitch
Round 1
- Chain 21.
- Sc in the second chain from the hook.
- Sc across.
- Ch 1 and turn.
Rows 2–22
- Sc in each stitch across.
- Ch 1 and turn.
Form Pouch
- Fold the rectangle in half.
- Sew both side edges.
Drawstring Row
- Join yarn at the top opening.
- Ch. 1.
- Work sc, ch 1, skip 1 stitch around.
- Join with sl st.
Drawstring
- Chain 80.
- Thread through eyelets.
- Add beads if desired.
- Pull ends to close the pouch.
Finished size: Approximately 5 x 6 inches.
Suggested Materials
- Cotton yarn
- 4mm crochet hook
- Yarn needle
- Scissors
Customization Ideas
- Add stripes
- Use ombre yarn
- Attach tassels
- Add wooden beads to the drawstring
- Include a decorative shell-stitch border
Finished Uses
This crochet gift pouch works beautifully for wedding favors, holiday presents, party favors, and storing small accessories.
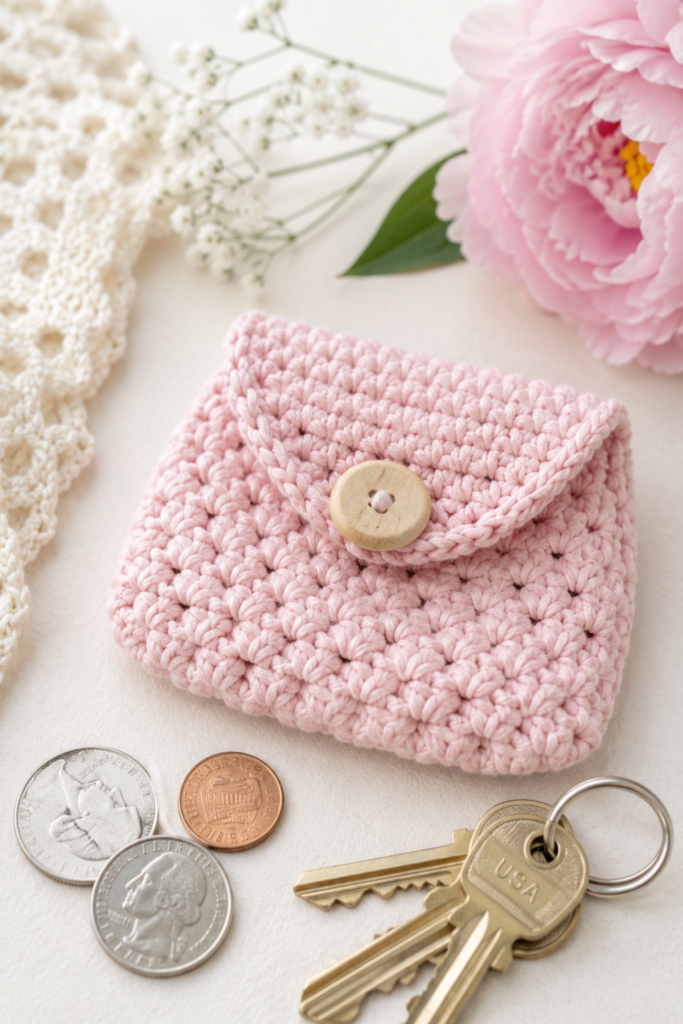
Crochet Coin Purse
Skill Level
Beginner
Best For
Coins, keys, earbuds, and small essentials.
A crochet coin purse remains one of the most searched crochet pouch patterns because it’s practical and easy to make.
The best designs feature:
- Button closure
- Kiss-lock frame
- Zipper closure
- Fold-over flap
Step-by-Step Tutorial
Materials
- Cotton yarn
- 4mm hook
- Button
- Yarn needle
Foundation
- Chain 16.
- Sc in the second chain from the hook.
- Sc across.
Rows 2–20
- Ch. 1.
- Turn.
- Sc across.
Create Flap
- Continue on one side only.
- Sc2tog at the beginning and end of each row.
- Repeat until the flap is rounded.
Assembly
- Fold the lower section upward.
- Sew sides.
Button Loop
- Ch 10.
- Attach to the flap.
- Sew a button to the front.
Finished size: 4 x 4 inches.
Why Make One?
A handmade crochet coin purse fits easily inside larger bags and keeps loose change organized.
Design Tips
Use cotton yarn and tight stitches to help the purse maintain its shape. Consider adding a fabric lining for extra durability.
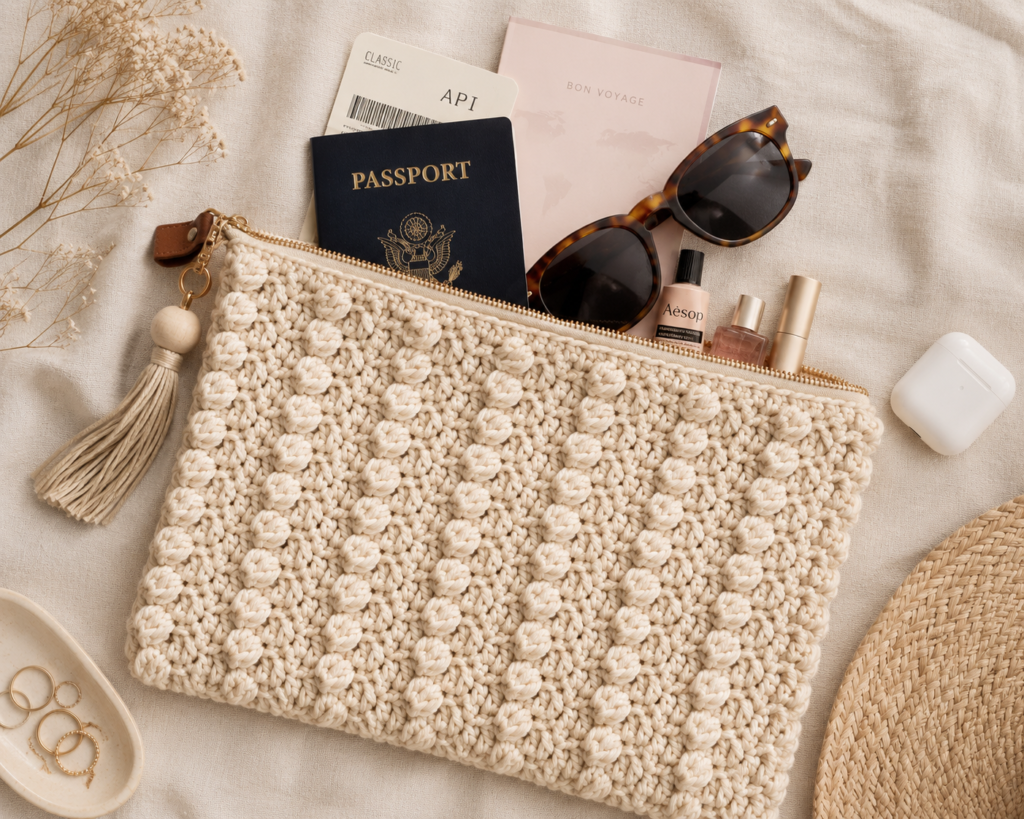
3. Crochet Zipper Pouch
Skill Level
Advanced Beginner
Best For
Makeup, stationery, crochet tools, and travel items.
Adding a zipper instantly gives a crochet pouch a polished, professional appearance. Many crocheters avoid zipper projects because they seem intimidating, but they’re much easier than they appear.
Step-by-Step Tutorial
Materials
- Cotton yarn
- 4.5mm crochet hook
- 8-inch zipper
- Sewing needle
Foundation
- Chain 31.
Row 1
- Sc in the second chain from the hook.
- Ch. 1.
- Skip 1.
- Repeat across.
Rows 2–26
- Moss stitches throughout.
Fold
- Fold the rectangle in half.
Sew Sides
- Whip stitch side seams.
Add a zipper.
- Position the zipper along the opening.
- Sew by hand.
- Secure both ends.
Finished size: 8 x 5 inches.
Benefits
- Secure closure
- Professional finish
- Great for selling
- Durable everyday accessory
Popular Stitch Patterns
- Moss stitch
- Lemon peel stitch
- Single crochet
- Tapestry crochet
Pro Tip
Choose a zipper color that either matches your yarn exactly or creates a bold contrast for a modern look.
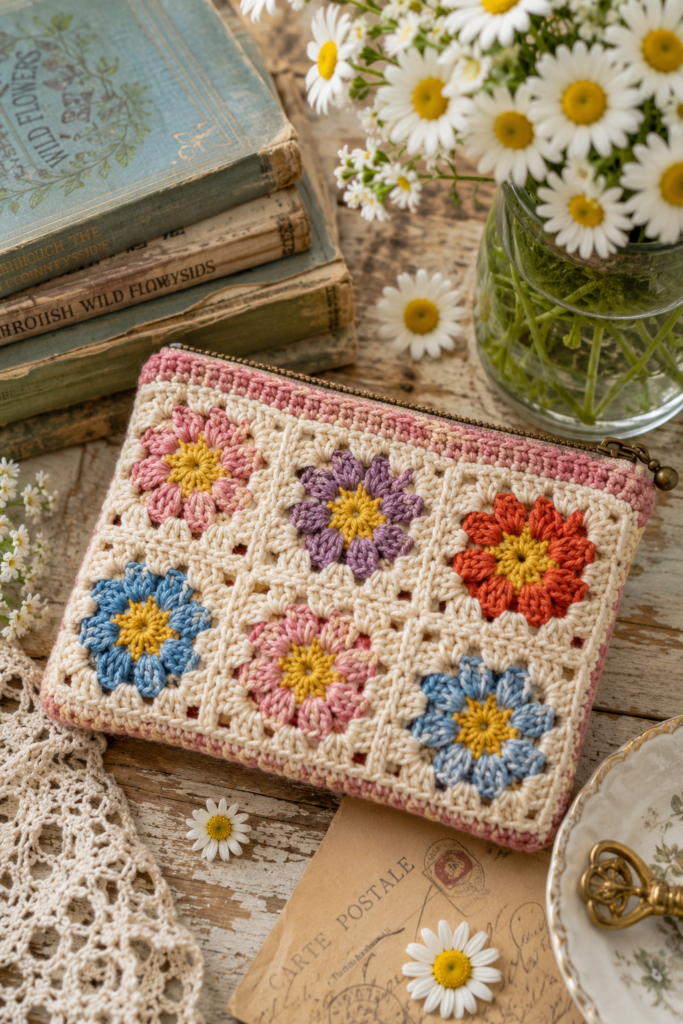
4. Granny Square Pouch
Skill Level
Beginner to Intermediate
Best For
Colorful accessories and stash-busting projects.
A granny square pouch combines vintage charm with modern functionality. This project is perfect for using leftover yarn in multiple colors.
Step-by-Step Tutorial
Materials
- Various yarn colors
- 4mm crochet hook
- Yarn needle
Make Granny Squares (4 Total)
Round 1
- Magic ring.
- Ch 3.
- 2 dc.
- Ch 2.
- Repeat 4 times.
- Join.
Round 2
- Work 3 dc clusters in corners.
- Ch 2 between corners.
Round 3
- Continue the traditional granny square pattern.
Join Squares
- Arrange four squares.
- Seam together.
Fold
- Fold the joined piece into a pouch shape.
- Sew sides.
Closure
- Add a button or zipper.
Finished size: 6 x 6 inches.
Why It’s Popular
- Endless color possibilities
- Beginner-friendly construction
- Trendy cottagecore aesthetic
- Pinterest favorite
Customization Ideas
- Floral granny squares
- Sunburst granny squares
- Daisy granny squares
- Solid granny squares
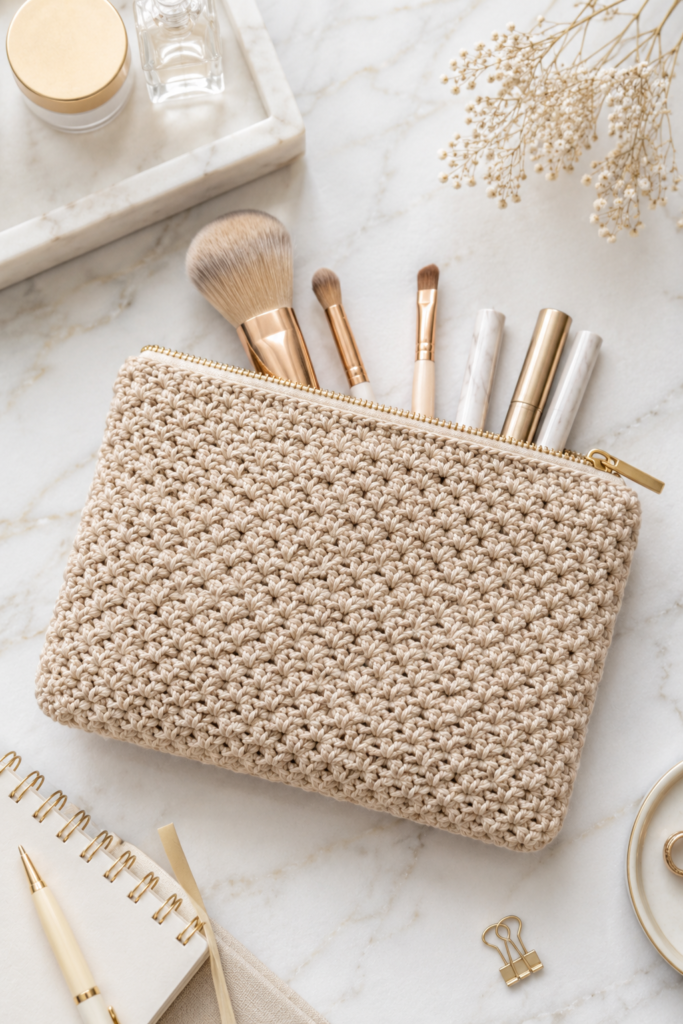
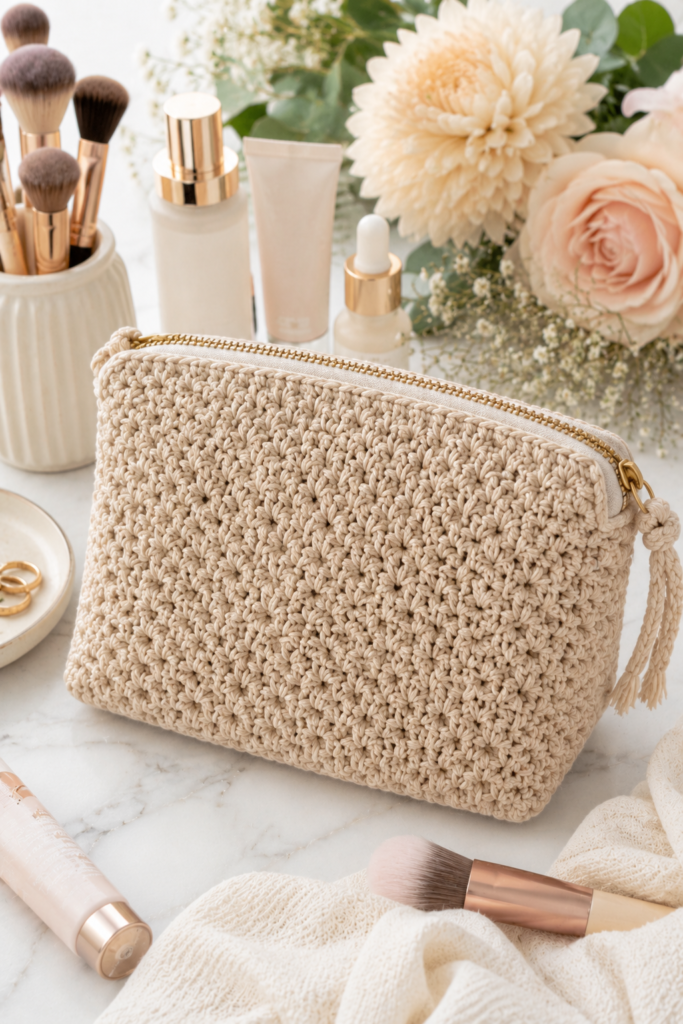
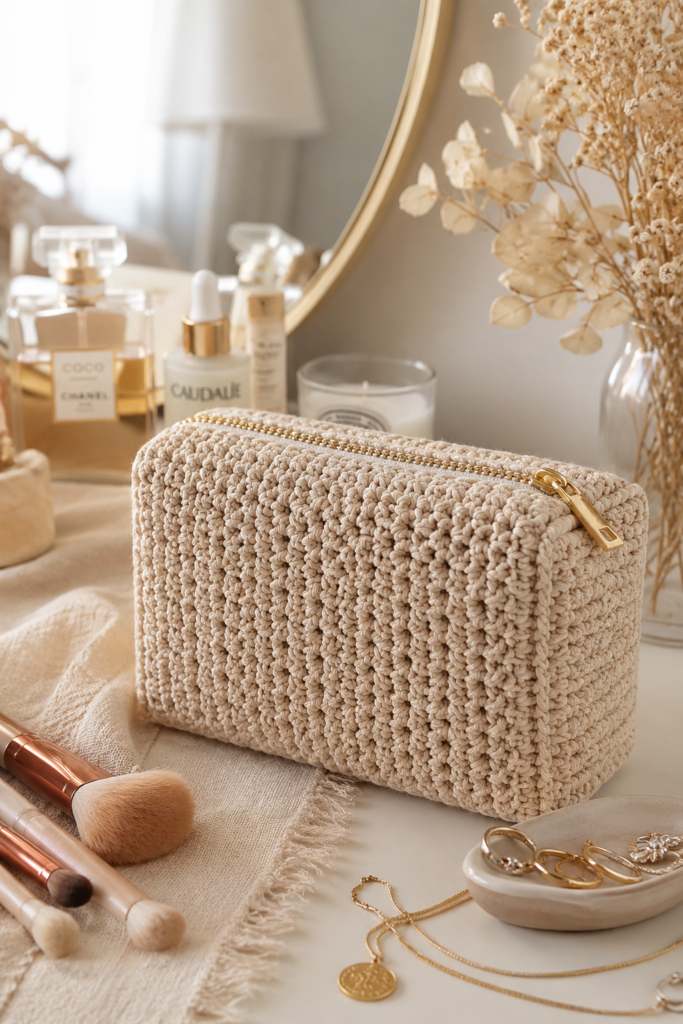
5. Crochet Makeup Bag
Skill Level
Intermediate
Best For
Cosmetics, brushes, skincare products, and travel.
A crochet makeup bag is larger than a standard pouch and offers plenty of storage for beauty essentials.
Step-by-Step Tutorial
Materials
- 150g cotton yarn
- 5mm crochet hook
- 10-inch zipper
- Fabric lining (optional)
Base
- Chain 41.
Row 1
- Hdc in the second chain from the hook.
- Hdc across.
Rows 2–30
- Hdc across.
- Ch 1 and turn.
Form Bag
- Fold the rectangle in half.
- Sew side seams.
Flat Bottom
- Pinch the bottom corners.
- Sew across corners.
Insert Zipper
- Sew the zipper to the top edge.
Optional Lining
- Cut fabric.
- Sew lining.
- Insert into a bag.
Finished size: 9 x 6 x 3 inches.
Customization Ideas
- Add floral appliqués
- Use striped yarn
- Add wrist strap
- Add inner pockets
- Use a granny-square panel
Features to Consider
- Zipper closure
- Waterproof lining
- Flat base
- Internal pockets
Best Yarn Choice
Cotton yarn works best because it holds structure and can handle frequent use.
6. Crochet Pencil Pouch
Skill Level
Beginner to Intermediate
Best For
Pens, pencils, markers, crochet hooks, and school supplies.
A crochet pencil pouch is a practical project that’s especially popular with students, teachers, and stationery lovers. It’s also a fantastic back-to-school crochet idea.
Step-by-Step Tutorial
Materials
- 150g worsted-weight cotton yarn
- 5mm crochet hook
- 10-inch zipper
- Yarn needle
- Stitch markers
- Fabric lining (optional)
Abbreviations
- ch = chain
- hdc = half double crochet
- sl st = slip stitch
Foundation
- Chain 41.
Row 1
- Hdc in the second chain from the hook.
- Hdc across.
- Turn.
Rows 2–30
- Ch. 1.
- Hdc across.
- Turn.
Assemble the bag.
- Fold the rectangle in half.
- Sew both side seams.
Box the bottom.
- Flatten corners.
- Sew diagonally across each corner.
- Trim excess yarn if needed.
Insert Zipper
- Align the zipper with the top opening.
- Sew the zipper securely using a yarn needle.
Optional Lining
- Cut fabric to size.
- Sew a fabric pouch.
- Insert and stitch into a crochet bag.
Finished size: Approximately 9 x 6 inches.
Why You’ll Love It
- Functional and durable
- Quick to crochet
- Easy to customize with colors and appliqués
- Perfect for craft fairs and Etsy sales
Design Ideas
- Faux knit texture
- Striped design
- Animal-themed pouch
- Granny square panel pouch
- Minimalist solid-color case
Pro Tip
Use a zipper closure to keep stationery secure and prevent items from falling out.
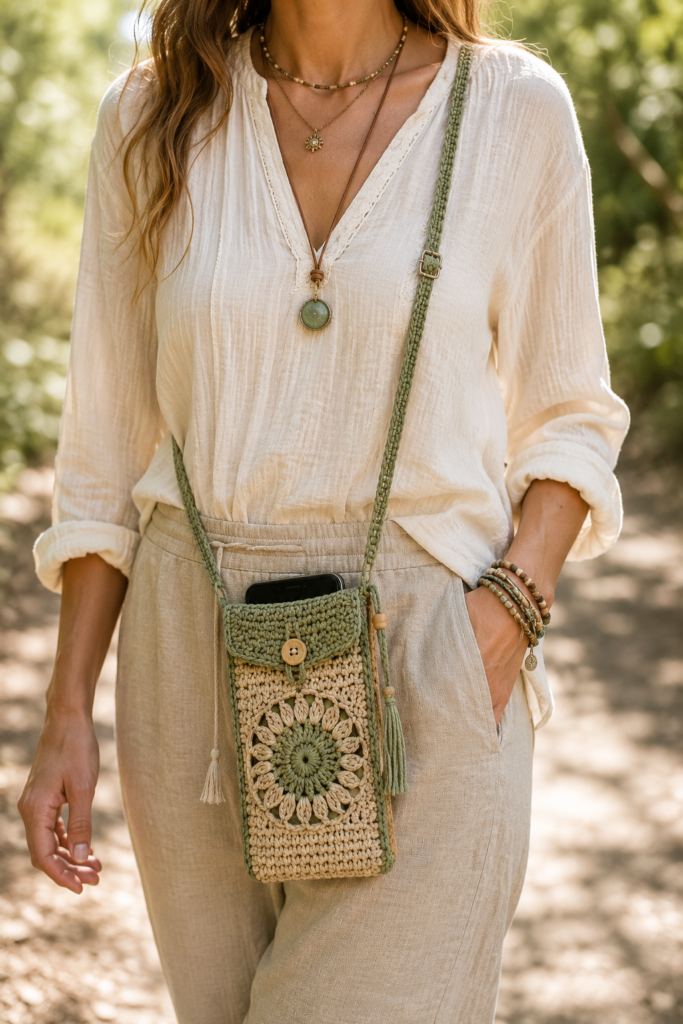
7. Crochet Phone Pouch
Skill Level
Intermediate
Best For
Smartphones, cards, and everyday essentials.
A crochet phone pouch combines style and practicality. Many designs include a strap, turning the pouch into a lightweight crossbody accessory.

Step-by-Step Tutorial
Materials
- 100g cotton yarn
- 4.5mm crochet hook
- 9-inch zipper
- Yarn needle
Foundation
- Chain 36.
Row 1
- Sc in the second chain from the hook.
- Sc across.
Rows 2–24
- Ch. 1.
- Turn.
- Sc across.
Fold and Sew
- Fold the rectangle in half lengthwise.
- Sew side seams.
Add a zipper.
- Position the zipper along the top edge.
- Stitch the zipper in place.
Optional Decorations
- Initials
- Flower appliqués
- Stripes
- Tassels
Finished size: Approximately 8 x 3 inches.
Features to Include
- Adjustable strap
- Button or magnetic closure
- Card pocket
- Textured stitch pattern
Popular Styles
- Boho crochet phone pouch
- Minimalist neutral pouch
- Granny square phone bag
- Floral crochet phone pouch
Best Yarn Choice
Cotton or cotton-blend yarn provides durability and helps the pouch keep its shape.
8. Crochet Travel Organizer Pouch
Skill Level
Intermediate
Best For
Travel essentials, passports, cables, chargers, and cosmetics.
A crochet travel organizer pouch is larger and more structured than a simple pouch. It’s perfect for keeping small items organized during trips.
Step-by-Step Tutorial
Materials
- 100g cotton yarn
- 4mm hook
- Button
- Yarn needle
Measure the phone.
- Measure phone width.
- Chain enough stitches to match the width plus 1 inch.
Example:
- Chain 18.
Round 1
- SC around the foundation chain.
- Work 3 sc in each end.
- Join.
Rounds 2–20
- Sc continuously looks around.
- Continue until the phone height is reached.
Flap
- Work only across one side.
- Crochet rows back and forth.
- Decrease edges gradually.
Button Loop
- Chain 10.
- Attach loop.
Strap
- Chain 100–120.
- Attach to pouch sides.
Finished size varies according to phone dimensions.
Why It’s Useful
- Keeps travel items organized
- Easy to pack in luggage
- Stylish handmade alternative to store-bought organizers
- Can be customized with compartments and lining
Design Suggestions
- Multiple interior pockets
- Zipper closure
- Flat-bottom construction
- Water-resistant lining
Customization Ideas
- Add a wrist strap
- Use color-blocking
- Include mesh pockets inside
- Personalize with initials or appliqués
9. Crochet Card Holder Pouch
Skill Level
Beginner
Best For
Cards, cash, IDs, and small essentials.
A crochet card holder pouch is compact, practical, and beginner-friendly. It’s one of the fastest crochet pouch projects you can complete.
Step-by-Step Tutorial
Materials
- 200g cotton yarn
- 5mm hook
- 12-inch zipper
- Fabric lining
- Yarn needle
Foundation
- Chain 51.
Row 1
- Hdc across.
Rows 2–36
- Hdc across each row.
Fold
- Fold the rectangle in half.
Sew Side Seams
- Join both sides securely.
Box Corners
- Flatten bottom corners.
- Sew across each corner.
Add Interior Pockets
- Sew fabric pockets onto the lining.
- Attach lining to pouch.
Insert Zipper
- Sew a zipper to the top opening.
Finished size: Approximately 11 x 7 inches.
Organizer Ideas
- Passport pocket
- Cable compartment
- Cosmetic section
- Pen holder
Why Make One?
- Uses very little yarn
- Quick to finish
- Perfect for gifts and stocking stuffers
- Easy to customize with buttons or snaps
Popular Closures
- Button flap
- Snap closure
- Envelope-style fold
- Zipper closure
Pro Tip
Make the pouch slightly snug so cards stay secure without stretching the fabric too much.
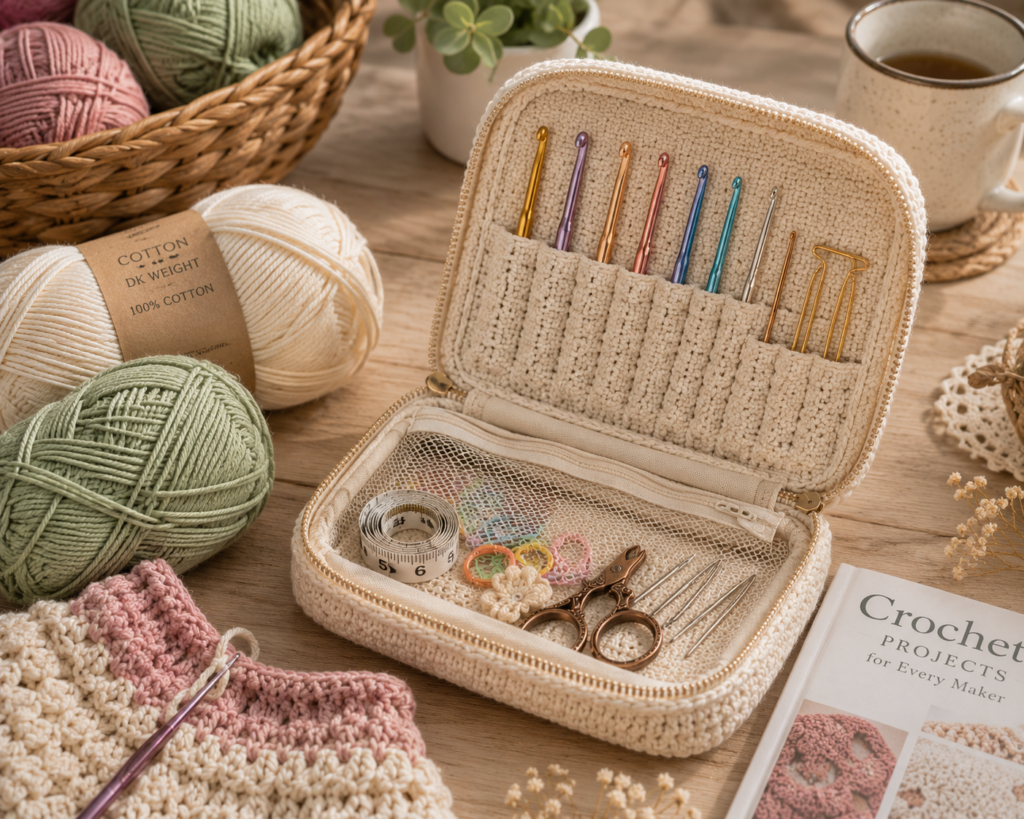
10. Crochet Notions Pouch
Skill Level
Intermediate
Best For
Crochet hooks, stitch markers, scissors, tapestry needles, and small crafting tools.
Every crocheter needs a crochet notions pouch to keep supplies organized. This project is both practical and deeply satisfying to make for yourself or another crafter.
Step-by-Step Tutorial
Materials
- 120g cotton yarn
- 4.5mm crochet hook
- 8-inch zipper
- Yarn needle
Foundation
- Chain 31.
Row 1
- Sc in the second chain from the hook.
- Sc across.
Rows 2–28
- Ch. 1.
- Turn.
- Sc across.
Texture Option
Replace every 4th row with:
- Front loop-only single crochet
This creates a subtle texture.
Fold
- Fold the rectangle in half.
Sew Sides
- Whip stitch side seams.
Insert Zipper
- Attach a zipper along the top opening.
Add Interior Hook Holders (Optional)
- Sew elastic strips inside.
- Create sections for hooks and tools.
Finished size: Approximately 8 x 5 inches.
What to Store Inside
- Crochet hooks
- Stitch markers
- Measuring tape
- Scissors
- Yarn needles
- Row counters
- Small project accessories
Must-Have Features
- Secure zipper closure
- Sturdy fabric
- Enough depth for hooks and tools
- Optional internal pockets
Best Stitch Patterns
- Moss stitch
- Waffle stitch
- Single crochet for durability
- Tapestry crochet for decorative designs
Why It’s a Great Project
- Extremely practical
- Great for organizing your craft space
- Makes a thoughtful gift for crocheters
- Excellent craft fair item
Frequently Asked Questions
What is the easiest crochet pouch pattern for beginners?
The easiest crochet pouch pattern for beginners is a simple drawstring pouch made with single crochet stitches. It requires minimal shaping, basic stitches, and very little yarn.
What yarn is best for crochet pouches?
Cotton yarn is usually the best choice for crochet pouches because it creates a sturdy fabric that holds its shape well. Cotton blends are also excellent for durability and softness.
How long does it take to crochet a pouch?
Most crochet pouches take between 1 and 5 hours, depending on the size, stitch complexity, and your crochet speed. Simple coin purses and drawstring pouches can often be finished in a single evening.
Can beginners crochet zipper pouches?
Yes! Beginners can crochet zipper pouches by using simple stitch patterns and sewing in a zipper after completing the pouch. Start with a basic rectangular pouch and a standard zipper for the easiest experience.
How do I make my crochet pouch more durable?
To make a crochet pouch more durable:
- Use cotton yarn
- Crochet with tight stitches
- Choose a slightly smaller hook for denser fabric
- Add a fabric lining
- Reinforce stress points like straps and corners
What can I use crochet pouches for?
Crochet pouches can be used for:
- Coins and cash
- Makeup and cosmetics
- Travel essentials
- School supplies
- Phone and earbuds
- Crochet notions and tools
- Gift packaging
- Jewelry and accessories